Census Manual
Infinite Campus
Census Manual
Last Updated: September 30, 2025
Table of Contents
Add Person: Create Student Record
Enrollment: Create a School Record
Add Person: Create Contact Record
Add A Transportation Address to an Existing Student Record
- Transportation things to remember
- Entering A Bus Request
- Editing A Bus Request
- Car Rider/Student Drivers (Parking Pass)
- Choice
Add Person: Create Student Record
Purpose: This screen is used to create both student and contact records. The instructions that follow are to identify a student. BEFORE YOU START: Be sure your Context is reflecting the correct school year and building.
Path: Census > People > Add Person
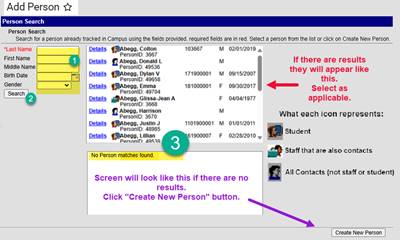
You MUST search first to see if the student is already in the system!
In an effort to not duplicate any students or contacts, enter the first few letters of Last name (required), first few letters First Name, Date of Birth and click the Search button.
(Example: Full name is: Michael Thomas Johnson Darby. You could try the following combinations of last name: John, Darby, Johnson, Johnson Darby, Johnson-Darby. For the first name try: Mich, Mike, Michael and the middle name try: T, Tom, or Thomas). Search all combinations to avoid duplication.

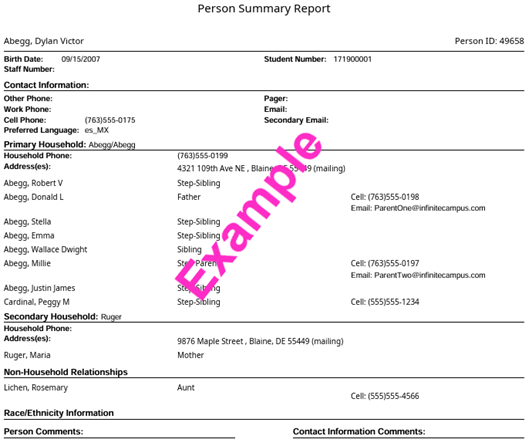
· If results are provided, review those listed to select the matching student record. If you are not sure which student to select, click the “Details” link. A Person Summary Report, see screenshot to the right, will appear providing additional information. Here you can see if household members are the same as those listed for the student you are attempting to register. Click the “X” in the upper right of the pop-up screen to return to the search results.
· If you do have a matching result. Select the student. You will be taken to the Demographic screen. Review and update information as applicable and continue through registration process.
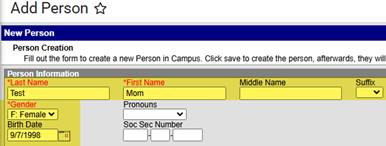
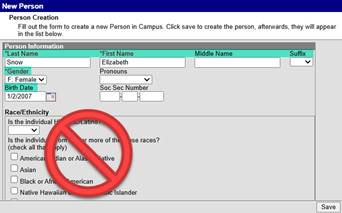
· If the results provided do not match the student you are attempting to add or there are no results and you’ve attempted searching several ways for the person, click the Create New Person button. You will be taken to the Add Person screen.
- Enter as applicable to the student:
- Last Name
- First Name
- Middle Name
- Suffix
- Gender
- Date of Birth
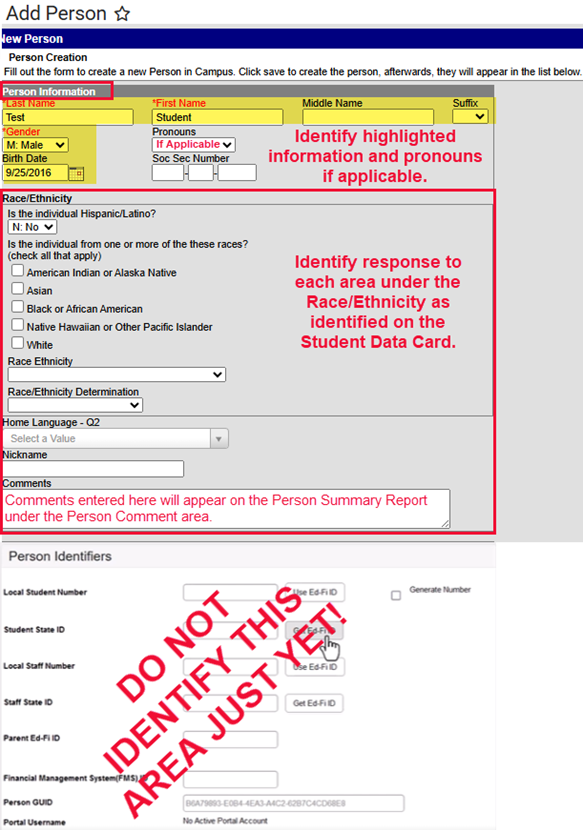
- Identify the Race/Ethnicity fields
- Nickname
- Comments: comments identified here will appear on the Person Summary Report under the Person Comment area.
- Identify as much information on this screen as possible. Information identified on this screen will be transferred to other screens in the system as applicable.
- Do not identify the Person Identifiers just yet.
- Click Save.
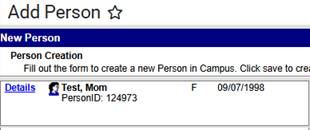
Once the record is saved this screen will appear:
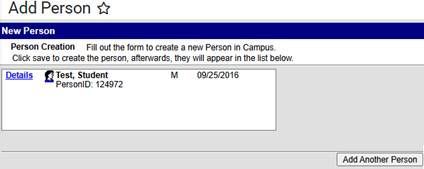
- Click on the Student Name you will be taken to Demographics screen (Related Tools menu on the right side of the screen).
The Demographics screen is broken down into three sections: Person Information, Person Identifiers and Personal Contact Information.
Person Information area:
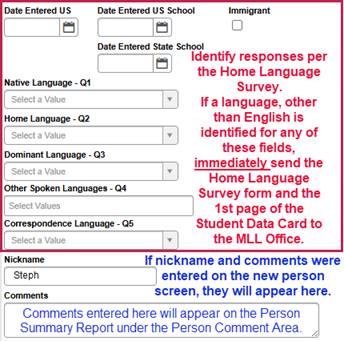
At the top of this screen is the information you just entered. Review for accuracy. Scroll to the Home Language Survey questions, just below the Race/Ethnicity information.
- Home Language Survey questions: Enter HLS responses in applicable fields. If a language other than English is identified immediately send the HLS and page 1 of the Student Data Card to the MLL Office.
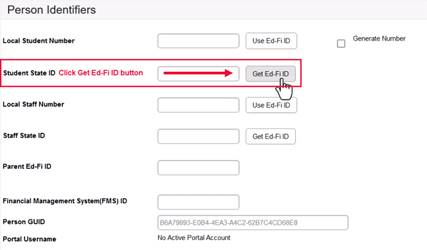
Person Identifiers:
This is where you will obtain the student ID #.
- Click the Get Ed-Fi ID button:
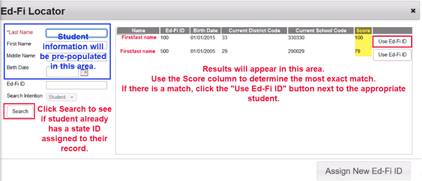
The Ed-Fi Locator screen will appear. Student information will be pre-populated on the left.
- Click Search button to search Ed-Fi.
- Be sure to use the score column and unique identifiers (DOB, spelling of the name) to determine the most exact match.
- Review results to determine if there is a match. If there is a match Click Use Ed-Fi ID button to make your selection.
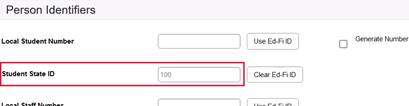
- You’ll go back to the Demographics screen.
- In the Person Identifiers section of the screen, the ID # will be in the Student State ID field. It will be grayed out and cannot be edited.

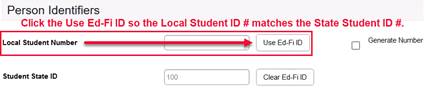
- Click the Use Ed-Fi ID for the Local Student Number field so it matches the Student State ID. You could also copy the Student State ID to the Local Student # field.

- If the student is not found in Ed-Fi (No Results Found) or there are students listed, but they do not match the student you are registering, and you have done your due diligence and searched EVERY combination of the student’s name:
- Click the Assign New Ed-Fi ID button located in the bottom right of the Ed-Fi Locator screen
- You will be taken back to the Demographic screen where a new state ID will be identified in grey and cannot be changed.
- Click the Assign New Ed-Fi ID button located in the bottom right of the Ed-Fi Locator screen
- Click the Use Ed-Fi ID button or copy and paste the Student State Number to the Local Student Number field.
- Click save button (blue button, top left of Demographic screen).
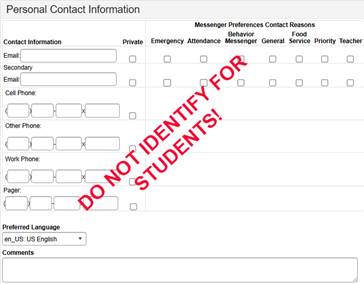
Personal Contact Information:
This is the last area on the Demographic screen. For the student you will not identify anything here. Red Clay will automate the student email address overnight.
Enrollment: Create a School Record
Purpose: At this point you have a student and an ID #. Now you need to assign the student to a building.
- Click the Enrollments tool on the Related Tools menu (on the right of the screen).
- Click New button (blue button at top of the screen).
- The Enrollment screen opens.
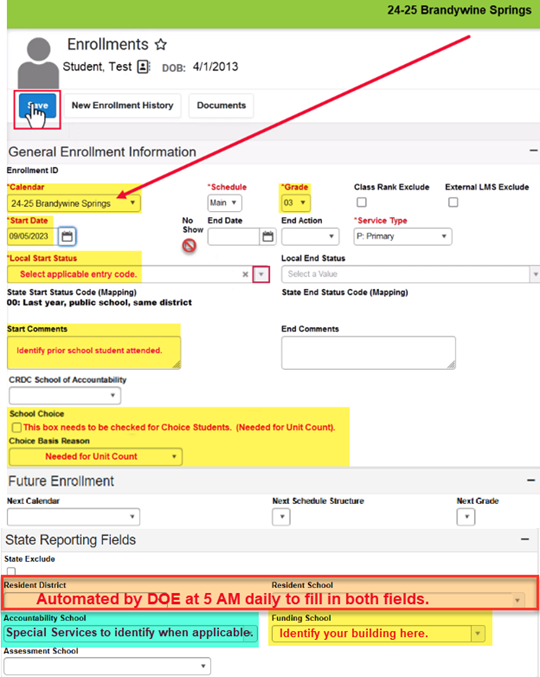
- General Enrollment Information:
- Calendar: The school year and building is auto populated to match your Context Switcher (in the banner).
- Complete all required fields: Grade, Start Date, and Local Start Status.
- Start Comments: Identify prior building information, if applicable.
- School Choice: Must be checked for all Choice students (Needed for Unit Count).
- Choice Basis Reason: Must be identified for Choice students (Needed for Unit Count).
- State Reporting Fields:
- Resident District: DOE runs a script at 5 AM every day to identify based on physical address.(Needed for Unit Count).
- Resident School: DOE runs a script at 5 AM every day to identify based on physical address. (Needed for Unit Count).
- Accountability School: Special Services will identify if applicable. (Needed for Unit Count)
- Funding School: This field should match your building. (Needed for Unit Count).
- Save.
- General Enrollment Information:
- The student is now enrolled in the building:

Now you will need to add the family members and any other contacts (CCP, etc…) to the student’s record. All contacts are created by using the Add Person feature.
Add Person: Create Contact Record
Purpose: This screen is used to create both student and contact records. Use these instructions to create contact records.
Path: Main Menu > Census > People > Add Person or from Related Tools > Add Person
You MUST search first to see if the contact is already in the system!
In an effort to not duplicate any contacts, enter the first few letters of Last name (required), first few letters First Name, Date of Birth (if provided) and click the Search button. Entering this information assists in not duplicating people.
(Example: Full name is: Michael Thomas Johnson Darby. You could try the following combinations of last name: John, Darby, Johnson, Johnson Darby, Johnson-Darby. For the first name try: Mich, Mike, Michael and the middle name try: T, Tom, or Thomas). Search all combinations to avoid duplication.
If there are results, select the appropriate person from the search results. Be sure to match the name and DOB if identified.
Remember, you are creating contact records now, so be sure you do not select a student record by mistake:
|
|
|

|
|
This is the icon for a staff person. A staff person can also be a contact in a student’s record. |
This is the icon for a student. |
This is the icon for a contact. |


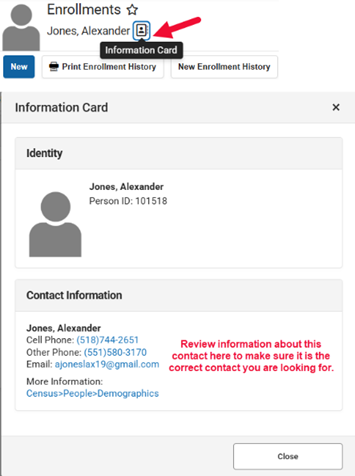
Note: If there are multiple results for the person and the names appear to be the same and the date of birth is the same, you can click on the Information Card icon to see additional information about the contact to make sure you are selecting the correct person.

If there are no matches and you’ve done your due diligence and searched EVERY combination of the name, select the Create New Person button on the screen.
The New Person screen appears.
- Enter:
- Last Name
- First Name
- Middle Name (if provided)
- Suffix (Jr., Sr., III…. if applicable)
- Gender
- Date of Birth (if provided be sure to enter to assist in not duplicating records.)
NOTE: Red Clay does not collect Race/Ethnicity for contacts and the contact does not get a Personal Identifier.
- Save (bottom right corner).
- Once saved the screen will look similar to this:
- Click the contact name. You’ll be taken to the Demographics screen.
- Person Information Section: Verify the information you just entered for the contact. The Home Language Survey information and Personal Identifiers do not apply to contacts.
- Personal Contact Information: scroll to this area at the bottom of the screen.
- Identify the contact’s information:
- Email: for guardian contacts click all the boxes to the right of the email field. Secondary email is not required. If it is listed, select the same options as identified for the first email address.
- Phone #’s: Enter all phone numbers provided in the applicable field.
- For guardian contacts select the options as identified in the screenshot.
- For non-guardian contacts identify fields as applicable. For the checkboxes identify emergency only for voice.
- Identify the contact’s information:
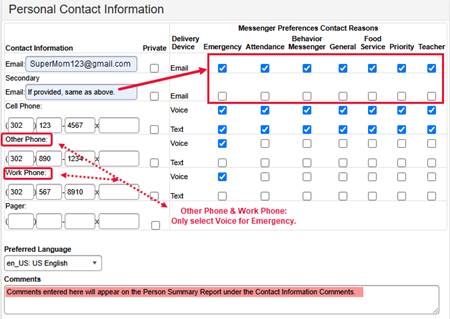
- Save (blue button top of screen).
- If other contacts need to be identified: Click the Add Person from the Related Tools menu on the right.
- Repeat the above steps for each contact to be identified in the student’s record.
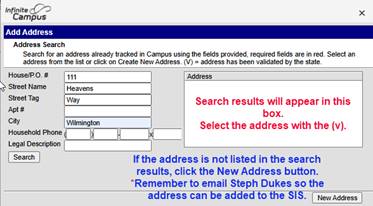
Add Address
Purpose: Select or create an address. All household and transportation addresses need to be searched and selected for use. If the address is not found it should be created.
Note: A verified physical address is required for unit count!
Path: Census > Addresses > Add Address
Before you can add an address, you MUST search for the address first to see if it already exists in the system.
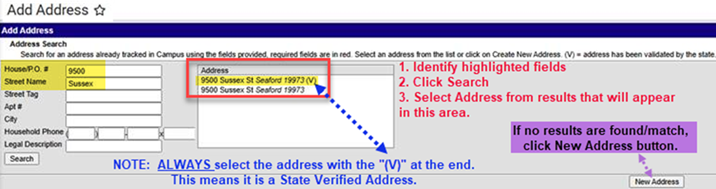
Always select the address with the “(V)” at the end of the address. The “(V)” means the address is a “State Verified Address”. All addressed need to be State Verified or students will not be included in Unit Count and the address will not flow to the transportation system.
If there are no results for the address search or the results do not match your address, click New Address and enter the address on the Address Information screen. Send the DSC Help Desk an email with the address and student ID # so that she can get the address added as a verified address.
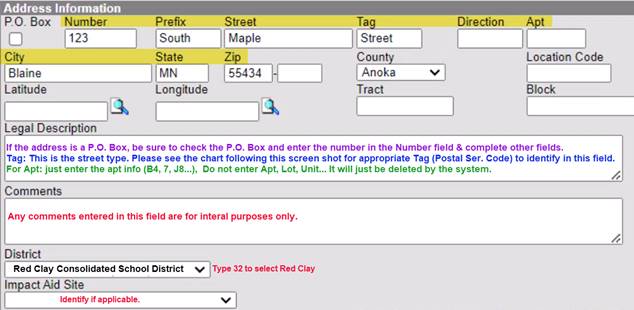
Note: See purple note in the above screenshot on how to identify a P.O. Box address.
To Verify the Address Saved: Main Menu > Census > Address Information
Click Save.
Below are the Postal Service Codes from the USPS website. Use these for the Tag field should the address you need not appear in the search results.
Note: If you are entering an address you need to email Steph Dukes the address so it can be added to the address search as a state verified address. Addresses not verified (v): student will not be included for Unit Count and transportation cannot be provided to such an addresses.
You can find Postal Codes here: Postal Codes
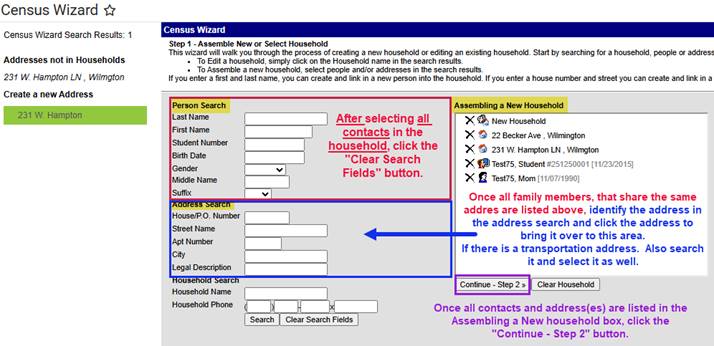
Create Household
Purpose: This screen is used to identify where the student and family members, sharing the same household, reside.
Path: Census > Household > Census Wizard
Step 1:
- In the Person Search area search for each member of the household (student, mom, dad…).
- Select the person’s name, from the “People Not in Households” to add them to the Assembling a New Household box.
- Repeat until all people that reside in the household are listed in the box.
- Click the “Clear Search Fields” button (next to the search button).
- In the Address Search area, search the address all the people in the box reside at.
- If a transportation address is needed, search and add it to the box as well.
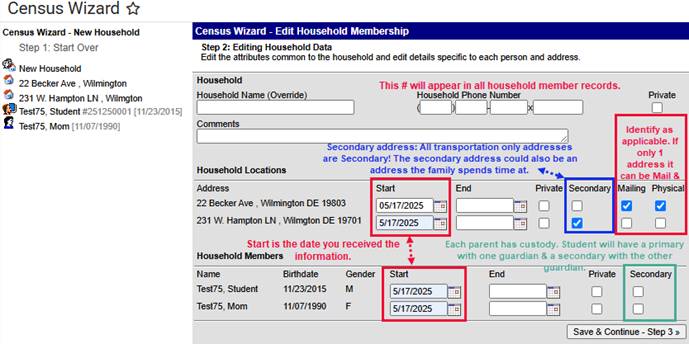
Step 2: Identify information about the household.
- Identify the household phone # (Primary Phone # on Student Data Card).
- Identify Start Date for each person listed.
- For each address listed, select boxes as applicable: Secondary, Mailing or Physical.
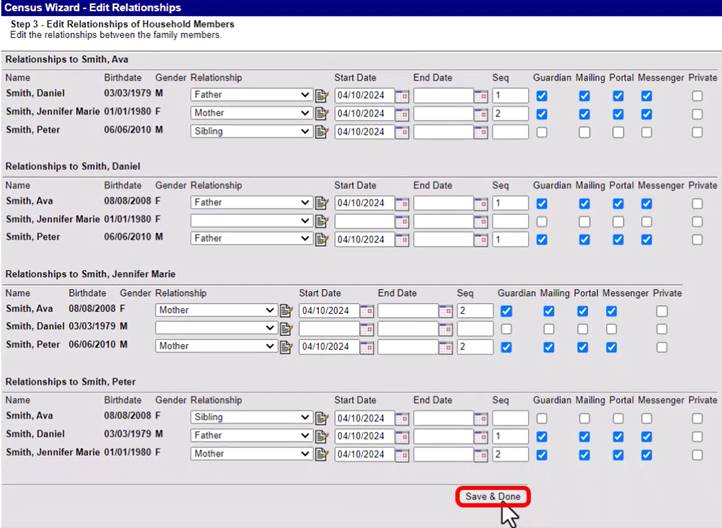
Step 3: Edit Relationships between Students and Household Members.
- Relationship: ALWAYS start with the student identifying the relationship of the person to the student. As you identify the relationship, if there are siblings the information will auto fill for the siblings as well. Starting with the student helps prevent confusion.
- Start Date: Is the date you received the information.
- Sequence (Seq): The order in which contact(s) are called in case of emergency.
- Check Boxes: Check as applicable to the relationship of the person to the student:
- Guardian: check the box if the contact is a guardian to the student.
- Mailing: If the address is a mailing address for a guardian, check the box.
- Portal: check for all guardian contacts grades EC – 12.
- Messenger: check for guardian contacts to receive messages about the student.
- Click Save & Done. Screen will flash and information will be saved.
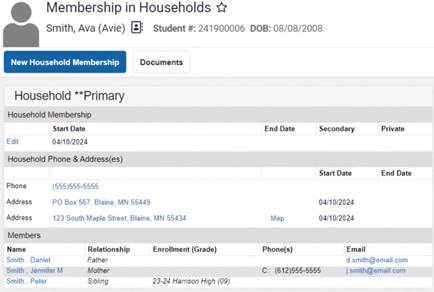
To view all this information, click the student icon from the Household search or go to:
Census > People > Membership in Households > Search for a student in the household and open their record.
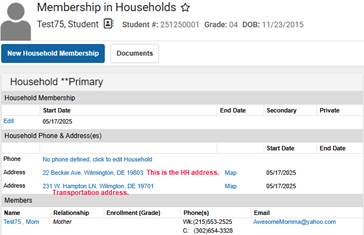
Add A Transportation Address to an Existing Student Record
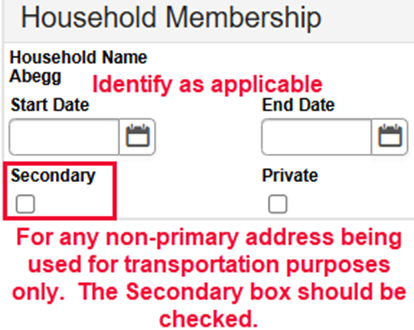
Purpose: To add a transportation only address to the student’s record. The address will be identified under the Household address as a secondary address. Do this if transportation is needed from and address other than the primary address (To/From School, To School Only or From School Only).
Path: Magnifying glass (Search) > Type: Household > Search: you could search the household name or the student’s name or the student ID #. Select the household icon/name.

The Household Information screen appears. If the address is not shown, select Household Addresses from the Related Tools menu:

- Click the Find New Address button to open the Address Search screen and enter the address to be added.
Note: if you added this address when you were adding the household address the address will appear here for selection.
- When the address is saved, you’ll be taken back to the Household Addresses screen where you will see the Household Location Detail for the address you just added. Identify the following:
- Start Date: The date you received the information.
- Select the Secondary box for the transportation address.
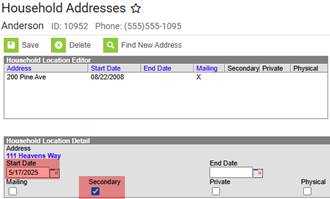
- Save
The screen will look similar to this:
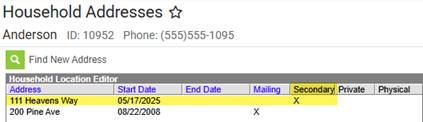
Below is an example of a household (HH) address with a transportation (CCP) address:
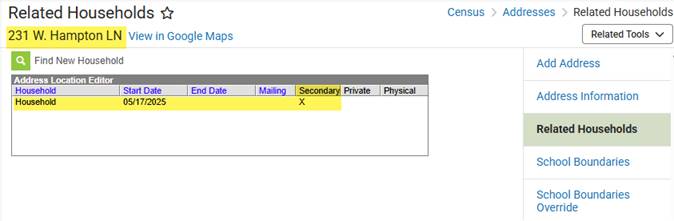
To verify the transportation address is tagged as secondary:
- Click the transportation address.
- This will open the Address Information screen.
- Select Related Households from the Related Tools menu on the right.
ALERT: When a transportation address is changed, whether it be the primary or secondary address, regardless if the address was added or ended, you MUST go to the Transportation screen and update the pick-up and/or drop-off locations as appropriate for the specific student the transportation applies to. See Entering a Bus Request and Editing A Bus Request in this manual for more information.
Transportation
Purpose: Identify students needing transportation with an appropriate transportation address to and/or from school as applicable. If transportation is needed to/from an address other than the primary address. The transportation address should be listed in the household as a secondary address.
Path: Main Menu > Student Information > Transportation > Search student
ALL non-primary addresses needed for transportation need to be identified in the student’s household as a secondary address! When a transportation address is changed, whether the address is the primary or secondary address, the Request screen for transportation needs to be edited as well FOR THE SPECIFIC STUDENT THE CHANGE APPLIES TO!
Do’s and Don’ts of Requesting Transportation when Registering Students or Changing Addresses:
DO NOT watch any training videos for transportation provided by Infinite Campus! All training should be what is provided by The Red Clay Transportation office and DSC. If you have questions, please contact the Transportation Office at 302.322.0251 or the DSC Help Desk: helpdesk@dataservice.org.
DO remember District policies and practices regarding Transportation Options for Students in feeder and Choice, have not changed. The only guaranteed Choice stops are found on the Transportation Page (https://www.redclayschools.com/Page/2886) on the Choice Website.
Transportation things to remember:
- Red Clay DOES NOT offer week-on week-off or multiple addresses for pick-up or drop-off. Every student is provided:
- ONE stop at one location in the A.M. The A.M. location must be the same Monday-Friday.
- ONE stop at one location in the P.M. The P.M. location must be the same Monday-Friday.
- Red Clay DOES NOT provide transportation for less than five days a week.
- Anytime the transportation address needs to be changed, only update the Request for the specific student the change applies to, whether the address is primary address or a transportation only address (secondary):
- Go to the household:
- If the address is no longer valid for any students in the household, enter an end date for the address no longer needed.
- If there is a new address, add it as a secondary household. If the new address is:
- A new household address tag it as primary.
- A new transportation address, tag it as secondary.
- See Editing a Bus Request for step-by-step instructions to update the transportation information. This must be completed for the specific student(s) to be routed to the new address.
- Address: DO NOT type ANYTHING on the Request screen. Everything on this screen is a click of the mouse. All Transportation address(es) MUST be in the student’s Household. If the transportation address is different than the household address the transportation address is to be identified to the student’s household and tagged as “Secondary”. Be sure the address is a state validated address, the address has the (v), as Transportation will only be provided to and/or from state validated addresses. IMMEDIATELY notify Data Service Center (helpdesk@dataservice.org) if the address is missing from the verified address list.
- Bus stops are assigned by the TRANSPORTATION office ONLY. DO NOT change or alter bus numbers, times, or stops.
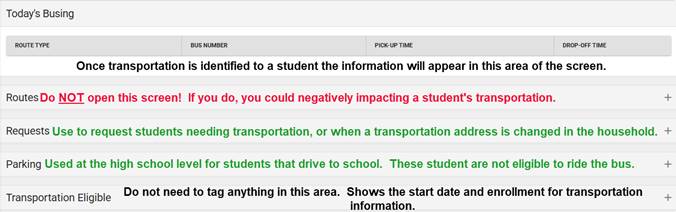
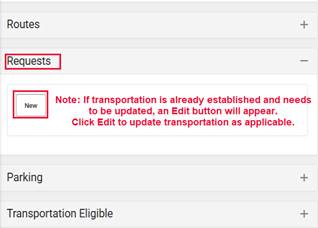
The Transportation screen in Infinite Campus has five options:
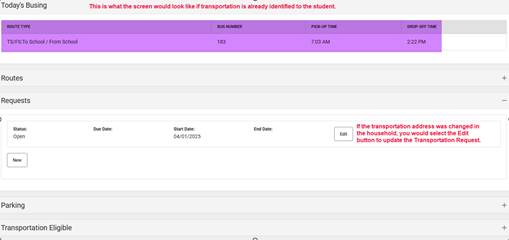
- Today’s Busing: Once a student is provided with transportation the Route Type, Bus #, and Pick-Up/Drop-Off Times will appear in this area.
- Routes: DO NOT OPEN the Routes! Bus stops are assigned by the TRANSPORTATION office ONLY. DO NOT change or alter bus numbers, times, or stops!
- Requests: If transportation information is not currently provided, no information showing under Today’s Busing, there will be a “New” button for you to select. Select New to enter a request. If the student already has transportation identified, but the transportation address was changed, click the Edit button to change/update the specific student’s transportation to and/or from school. See Entering A Bus Request or Editing A Bus Request as applicable for step-by-step instructions.
- Parking: Used at the high school level for students that drive to school. Remember, if a student drives to school, they are not eligible to ride the bus and need to be identified with a NT (No Transportation) on the Transportation Requests screen under the Route Type field.
- Transportation Eligible: Shows the start date and enrollment for transportation information identified on the screen. No need to identify anything on this screen. Does not apply to School Districts.
Entering A Bus Request:
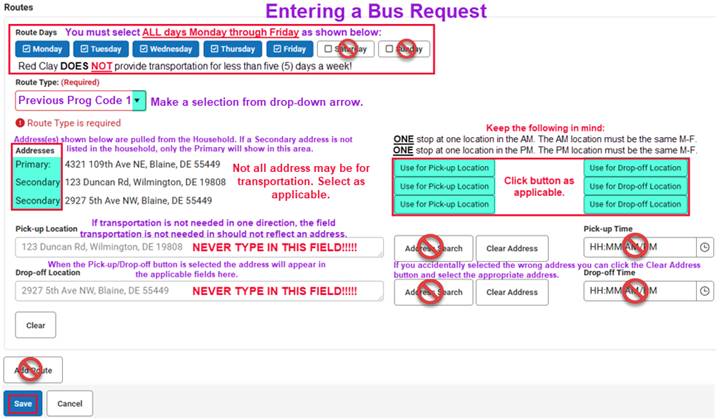
Keep in mind Red Clay Students are provided:
- 1 SEAT, 1 BUS and 1 ADDRESS in the A.M. for pick-up. The A.M. address must be the same for each day of the week, Monday-Friday. Students can only ride the bus they are assigned.
- 1 SEAT, 1 BUS and 1 ADDRESS in the P.M. for drop-off. The P.M. address must be the same for each day of the week, Monday-Friday. Students can only ride the bus they are assigned.
Example: Student is assigned bus 237 in the AM and bus 189 in the PM to a different address. Student cannot get on bus 237 in the PM or bus 189 in the AM!
To enter a request, the transportation address must be a state verified (v) address identified in the household.
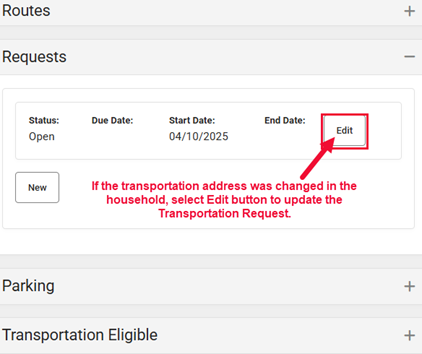
Click on Requests: If the student is not assigned transportation a New button will appear. Click to open the Request Details screen and complete the information
Note: If transportation is already identified an Edit button will also appear. Click the Edit button if the request needs to be updated/changed. See Editing a Bus Request in this manual.
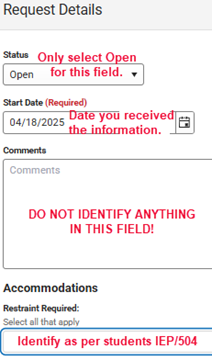
Status: Identify “Open”
Start Date: Date you were provided the information.
End Date: Do not identify an end date.
Comments: Do not enter any comments.
Accommodations:
Restraint Required (a.k.a Program Code 2 in eSP): Car Seat, Harness Belt, Seat Belt, or Wheelchair. Identify as per student’s 504/IEP. If the student does not have this information identified in their 504/IEP or does not have a 504/IEP, leave this field blank.
Routes:
Route Days: Monday through Friday should be checked. Red Clay DOES NOT provide transportation for less than five days a week! Do not check Saturday or Sunday!
Route Type: (a.k.a Program Code 1 in eSP): Is used for tagging students into a district program. The SE code is for Meadowood use ONLY!
| RG (Regular) | NT (No Transportation) | SE (Meadowood ONLY) | MA (3 yr old morning) |
| CR (Choice) | AU (Autism Program) | AD (All day pre-K) | MP (3 yr old afternoon) |
Address:
The primary and any secondary household address(es) will appear in this area. Each address will be marked as identified in the household, either Primary or Secondary.

Click the box to the right of the address to identify if the address should be “Use for Pick-up Location” or “Use for Drop-off Location”. If one address is both pick up and drop off, select accordingly.
As the button is clicked the address(es) will fill in the fields below. DO NOT type an address in either of these fields. If transportation is already provided these fields will identify the address for pick-up and/or drop-off as applicable. If the address(es) need to be changed, see Editing A Bus Request in this manual for appropriate steps.
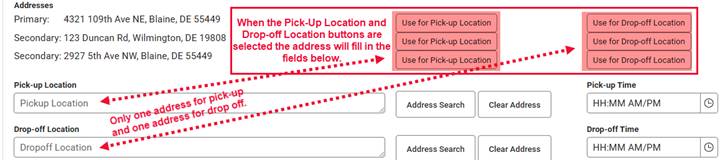
Note: If an address listed is not used for transportation that is okay. Only select the Pick-up and/or Drop-off location button IF the address is used for transportation to/from or both to & from.
Please be advised, if the address is NOT A VERIFIED ADDRESS, TRANSPORTATION WILL NOT RECEIVE THE INFORMATION!
Remember to click the Save button when all transportation is identified.
Eligibility: no need to open this area. Does not apply to School Districts.
Editing A Bus Request
Purpose: How to edit a student’s transportation request if the student already has transportation identified and the transportation address changed. Remember to end date the current transportation address, add the new transportation address and the come to the specific student’s Transportation screen that needs to be adjusted.
This is what a student with transportation assigned would look like:
Follow these steps when a transportation address changed:
- If the transportation address is no longer needed for any of the students in the household, end date current transportation address in the household first.
- If necessary, add new address to household, identify primary/secondary as applicable.
- The address must be a state verified (v) address identified in the household
- Select the specific student in the household the change applies to and open their Transportation screen.
- Under Requests click the Edit button:
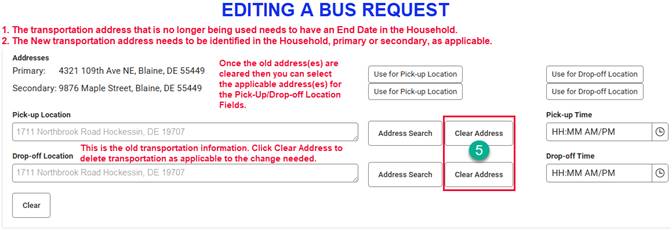
- Click the Clear Address button to the right of the address field, to delete the prior address in the Pick-up Location and/or Drop-off Location field.
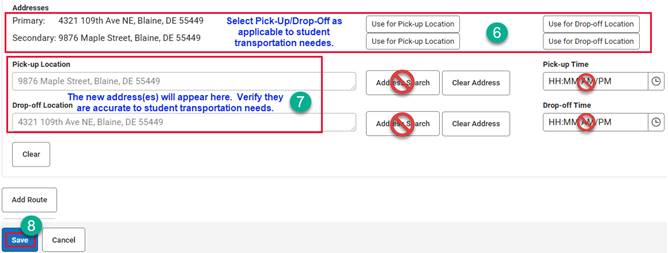
- Select the address for “Use for Pick-up Location” and/or “Use for Drop-off Location”, as applicable to student transportation needs, from the buttons next to the primary and/or secondary addresses listed.
- Verify new address(es) are reflecting correctly for the Pick-Up and/or Drop-off fields.
- Save
Note: The below green numbers (5-8) inside the screenshots match up with the steps listed in the above text.
Eligibility: no need to open this area. Does not apply to School Districts.
Car Rider/Student Drivers (Parking Pass)
DO enter the students Route Type field (a.k.a. Program Code 1) with an NT if student is designated as a car rider/driver.
Students are NOT eligible for a bus seat if they are a car rider/driver.
If student has bus transportation and will become a car ride/driver:
- End date the transportation in the household, if applicable.
- Open the Request
- Click Clear Address for the appropriate direction or both if applicable.
- Save
- Identify NT (No Transportation) in Route Type field (a.k.a. Program Code 1)
- Save
Choice:
DO enter CR in program code 1 Route Type field (a.k.a. Program Code 1) for ALL Choice students including:
- ALL Cab Calloway
- ALL Conrad
- ALL BSS 6-8 students
- ALL Dickinson 6-8 students
- ALL other students who live outside your school attendance zone.
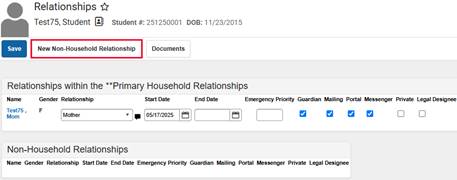
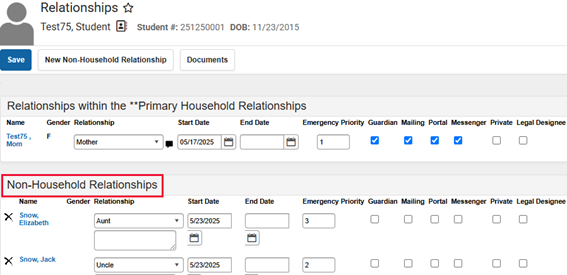
Non-Household Relationships
Purpose: Add contacts that do not reside at the household address: emergency and other contacts.
If you need to add a non-household contact that may have been missed or the guardian identifies later, you can do it from here as well.
The relationship of these contacts to the student is identified on the Relationship tab.
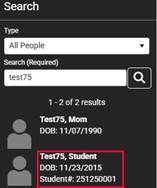
Path: Census > Relationships > Magnifying glass (Search): Type: All People; Search: student name
- Select the student from the search results and the Relationship screen will open.
- Verify the contact is not listed. Click the New Non-Household Relationship button near the top of the screen.
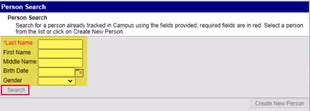
- This opens the Person Search screen.
- Enter search criteria (start with the last name and add other fields to narrow results. Keep in mind to use part of the name and all combinations to eliminate duplicate contact records) and click Search.
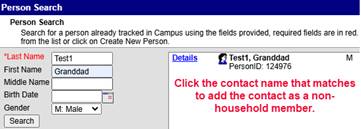
- Select the person from the results by clicking on their name.
- Note: The screen will not close, but you can see another person was added behind the Person Search screen.
- If no results are found or match click Create New Person button.
- Identify required fields and any other information you may have for the non-required fields (Race/Ethnicity information is not necessary for these contacts).
- Save
- Click on their name to add them to the Non-Household relationships.
- Close the window.
Note: If you added a person that was not found in the search and created their record from here, after saving the Non-Household contacts you will need to select the person and click Demographics from the Related Tools to identify the person’s phone number information (Personal Contact Information).
- Once all non-household members are identified, close the Person Search. The Relationship screen should be showing. You will now see the contacts under the Non-Household Relationship area.
- Identify the Relationship of each non-household contact to the student.
- Identify the Start Date (the date you received the information).
- Emergency Priority: Number each contact in order they should be reached.
- Save
IMPORTANT NOTE:Changes to a person’s Demographics record may erase historical information. When changes to a person's name, gender or birth date are necessary, create a new identities record (See Name or Identity Change in this manual) rather than updating information on this tool. Deleting a Demographics record is not recommended!
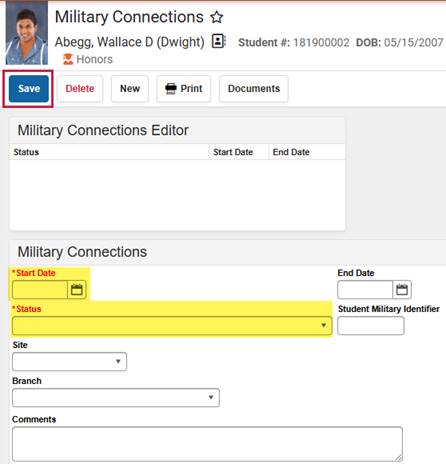
Military Connect Youth Form
Purpose: State/Federal requirement to identify as applicable based on response on the Military Connected Youth form if anything other than N/A is selected.
Note: If N/A is identified on this form, there is nothing to be identified in Infinite Campus. File the form in the student’s cumulative folder.
Path: Census > People > Military Connections > Search for the Student
- Click New
- Identify the Start Date (the date you received this information)
- Identify the Status by selecting from the drop-down arrow.
- Save
Program Participation
Purpose: This is where the KN Survey (Early Learning), FERPA, Foster Care and Homeless student information is identified. See below instructions for each and update Infinite Campus as applicable.
Path: Main Menu > Student Information > Program Participation > Select as applicable to data needing to be entered.
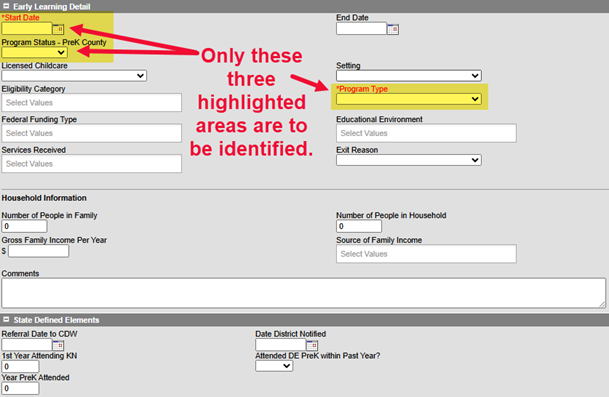
Early Learning (Kindergarten Survey)
The kindergarten survey is a form that is part of the kindergarten registration. The information identified on this form is to be entered into Infinite Campus.
- Select New
- Identify Start Date (date the information was provided to you).
- Identify End Date (last student day of the school year). Form is only valid for the school year.
- Use the Program Status drop-down arrow to select the county the pre-kindergarten experience was located.
- Program Type: Use the drop-down arrow and select as applicable.
FERPA
If you receive the Opt-out form requesting student information, not be shared, it will be identified in this area of Infinite Campus.
- Click New
- Identify start date (date you received the information).
- Identify end date (last student day of that school year).
- Select the school year.
- Data Opt Out – select all that apply.
- Question 1 & 2 identify as applicable:
- Grant permission to allow directory info to be shared…
- Grant permission for student’s contact info to be provided to US Military…
- Save
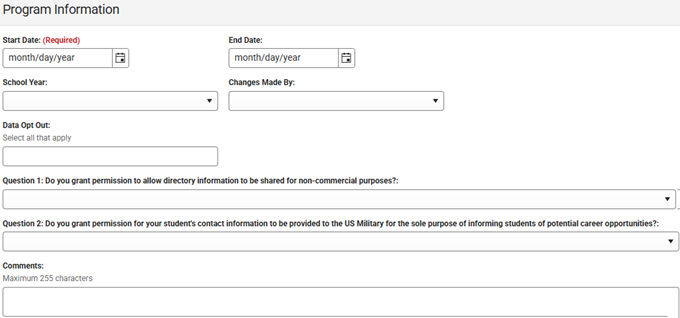
Note: FERPA form is only valid for the current school year, be sure to enter start & end dates.
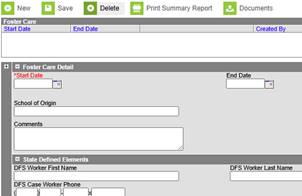
Foster Care
April Anderson completes this information.
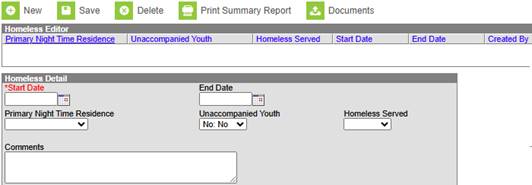
Homeless
April Anderson completes this information.
Flags
Purpose: Student notes/alerts for staff to see as it pertains to the specific student.
Path: Student Information > General > Flags > Search the student and open their record.
Assigning and Unassigning Flags:
IMPORTANT NOTE: Flags that show up in red text means the flag has been marked as inactive after it had been assigned to the student. The flag will remain in the student's record until the flag is identified with an end date or deleted from the student’s record.
How To Assign Flags to An Individual Student:
On the Flags screen you can see all of the flags that have been assigned to a student.
- Click the New button to add a flag to the student’s record.
- Flags: use the drop down to select the appropriate flag.
- Start Date: Identify the date you are assigning the flag to appear in the student’s record.
- User Warning: Enter the text that should appear when a user hovers over the icon in the student’s record. (Example: PFA on John Doe, uncle, exp 2/2050).
- Save and refresh your screen for the flag to reflect in the student’s record.
Note: Eligibility Start & End Dates, Participation Details and Description do not apply to flags. These are for a different purpose (Programs). Do not fill in these fields.
The flag will show in any Roster reports for the sections a student is scheduled into.
To Edit a flag for a Student:
- Open the student’s record
- Select the flag that needs to be edited and edit any of the fields as necessary. Remember: Eligibility Start & End Dates, Participation Details and Description do not apply to flags.
- Save
To Delete a flag for a Student:
- Open the student’s record
- On the Flags tab you can see all of the flags that have been assigned to a student.
- Select the flag that needs to be deleted and click the Delete button.
- Save.
How to Withdraw a Student
Purpose: The below information will assist you in verifying the student’s current status as well as walk you through how to withdraw a student.
Path: Census > Enrollments > Search the student and open the active record (record that does not have an End Date or End Status identified, usually bold at the top of the Enrollment Editor list).
Please keep in mind, in order to withdraw a student you should have a request for records identifying where the student will be attending and the start date of this new school. This could be in the form of an email/fax from the requesting school, a Withdraw Checklist form, an email from the guardian…
- Search the student in Infinite Campus and open the student’s enrollment record.
- When the student’s enrollment record is open look for the record that does not have a date identified for the End Date and the End Status is also not identified:
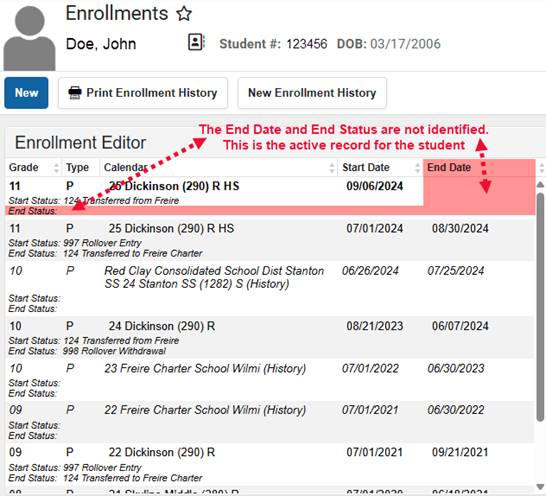
- Click on the active record to open the General Enrollment Information screen and complete the withdraw information highlighted in yellow: End Date, Local End Status, End Comments. DO NOT CHECK the “No Show”.
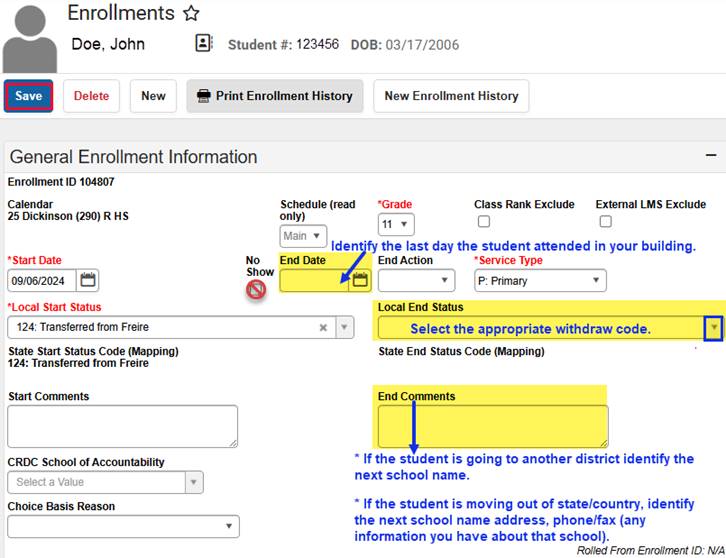
- Save
- Verify: Make sure to look at the Enrollment screen to confirm the information for the End Date and End Status is reflected correctly.

Modify Household Information
Path: Census > Households > Household Members > Search for the Household Name > Click the Household to open the Household Members screen.
You can also search the student and select Household Members from the Related Tools.
Remember:
- If the change of address places the student outside the attendance zone, the guardian needs to be informed of the new attendance zone school.
- If the new address is also used for transportation you will need to complete a transportation request form for this new address. Transportation does not automatically change, you MUST update the request in Infinite Campus. See Editing a Bus Request in this manual. Transportation will be provided within the attendance zone of your building. If transportation is no longer needed see Car Rider in the Transportation area of this manual. If the family decides to remain in the building be sure to have them complete and send Choice and Good Cause applications to the Choice Office.
To end a household membership:
- person no longer resides in the household moved to another residence {divorced parents, deceased contacts, etc..)
- Select the person leaving the household by clicking on their name.
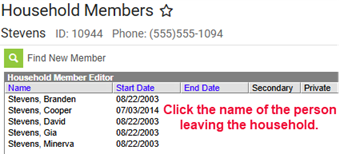
- In the Household Member Detail identify an End Date. The date you were informed of the information. Do NOT delete the person!
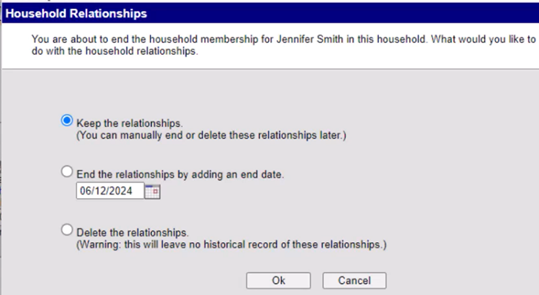
- Save Select the applicable option
- Keep the relationship – If person still is in student’s life.
- End the relationship – Identify the end date (Person is no longer in student’s life/decease?)
- Delete the relationship – Do Not select this option.
You will return to the Household Members screen where you will see the end date for the person that left the household.
Identifying the Contact to a new Household
If the person you just removed is in a new residence now you will need to identify the contact to a new household.
Path: Main Menu > Census > People > Membership in Households > Search for the contact changing residence
- Open the contact’s record.
- Screen will show the prior household membership as Dropped Membership.
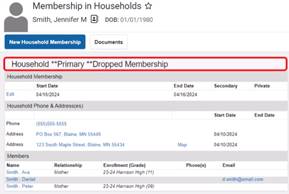
- To add a new household membership, click the New Household Membership button.
- Search to make sure the household does not already exist.
- If the new household is found, select it
- If the household is not found, click the New Household button
- Identify the household Phone # and any Comments
- Save
- Identify a Start Date for the new household.
- Save
- If a primary address is not identified to the new household add an address:
- Path: Main Menu > Census > Household > Household Addresses
- Click the Magnifying Glass to search for the household
- Type: Household
- Search: Type the new household name you just created.
- Select the household name from the search results
- The Household Addresses screen appears
- Click Find New Address
- Search the Address
- Select as applicable from the search results.
- If no results are found, click the New Address button.
- Fill in Address Information
- Click Save
- Identify the Start Date
- Check the Type of address: Mailing, Secondary, Private, Physical
- Save
If you added the person to a new household with other students, remember to add the relationship of this person to the student. You can click on the Relationships from the Related Tools menu.
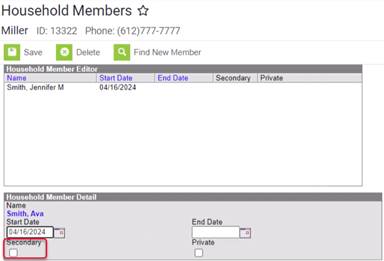
- To add anyone to the new household, including making this a secondary household for student(s):
- Click Household Members from the Related Tools menu on the right.
- This opens the Household Members screen. The person you just created a household for should be identified in the Household Member Editor box.
- Click Find a New Member button.
- Follow the steps to add a new person (See Add Person: Create Contact Record in this manual).
- On the Household Member Detail screen there is an option for Secondary.
- Selecting Secondary hear means the student lives part-time at this address and part-time at another address (primary)
To change an address:
- Search: Type: Household; Search: Student Name
- When the Household Members appear select Household Members from the related tools select Household Address.
- Click the Address and end date address.
- Save
- Find new Address (Top of screen)
- Identify the new address and select as applicable.
- Identify appropriate Mailing, Secondary, Private, Physical as applicable.
- Save
Name or Identity Change
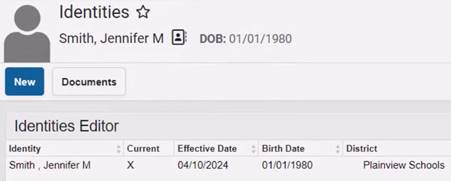
Path: Main Menu > Census > People > Identities > Search for the person needing a name/identity change and open their record.
The Identities screen appears reflecting the current identity of the person:
- Click New to create a new identify record.
- A new Identity Information screen appears.
- The current information appears in this new record.
- Now you can make changes needed, example: Last name change
- Save
- The Effective Date defaults to the current date, but you can change if needed.
- A new Identity Information screen appears.
Now both identities will appear. The current identity is identified by the “X” in the Current column.
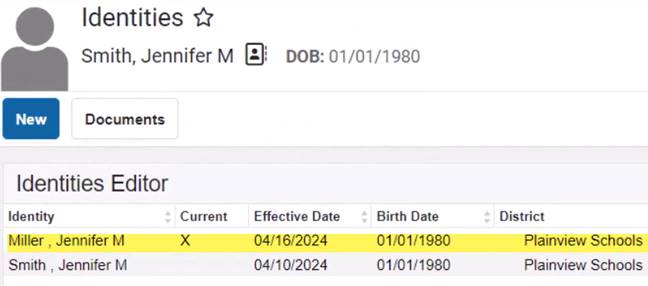
You can search on both identities (Miller, Jennifer or Smith Jennifer – both search results will yield Miller, Jennifer)
Census Reports
Census Verification Report
Path: Census > Reports > Census Verification Report
The report will print student census verification data. Data will page break by student and household.
Do your best to limit the number of students running per batch (maybe select a specific grade to generate). Do not select all options.
Types of reports you can generate:
- All grades > Transportation Bus Information
- All grades > Student Pictures
- Specific grade > Non-Household relationship contact information
- Specific grade > Primary Households
You can select the sort and format options as well.
Report Comments will display at the bottom of each page of the report.
Census by Birth Date Report
Path: Census > Reports > Census by Birth Date Report
Finds all students with a birth date in the range specified from Start Date to End Date.
Note: Start Date is required, but End Date is not.
If you don’t need birth dates within a range, you can select by birth month
The Effective Date: will generate the report based on students actively enrolled as of the date identified in the field for the criteria selected.
Check the boxes as applicable If you do not want to Show Birthday and Gender Information Only or Primary Household Information Only.
Select the Report Format.
Census by Address Report
Path: Census > Reports > Census by Address Report
Finds the latest student address active on or before the effective date identified. If the effective date is not identified the system assumes the effective date is the current date.
Select How you would like the report sorted, Student Name or address, and the format.
Data on the report will show: Student Name, ID #, Grade, Address and Start/End Date. The hyphen after the start date indicates no other address has been entered for the household or there is no end date for the address.
Mailing Labels
Path: Census > Reports > Mailing Labels
This report can be used to generate mailing labels for Students, Guardians, Teachers and Staff.
Print mailing labels for:
- Students
- Grade
- Course/Section
- Guardians
- Teachers
- Staff
Students to include:
- Grade: select the grade level(s) using the drop-down arrow I the field provided.
- Ad Hoc Filter: this is a report that may have been created by you or a report shared with you.
- Effective Date: defaults to the current date and will generate for students with enrollments as of that date.
Calendar Picker
- Calendar(s) to include: Select all the buildings you want to include in this report by clicking the box next to the building name and the school year box with the building name
- Show Active Year Only – you can turn this on or off
Format Options:
- Include:
- Guardian’s Name:
- Salutation: To the Parent/Guardian of:
- Private Mailing Address
- Starting Position
- Row
- Column
- Sort Order:
- Name
- City and Name
- Zip
- Report Format
- DOCX
Generate will give you a preview of the label.
If you are not happy with the format, go back and adjust until you are satisfied.